Showing posts with label O'Shashar. Show all posts

Saturday, September 29, 2012

Replacement Flying Bases


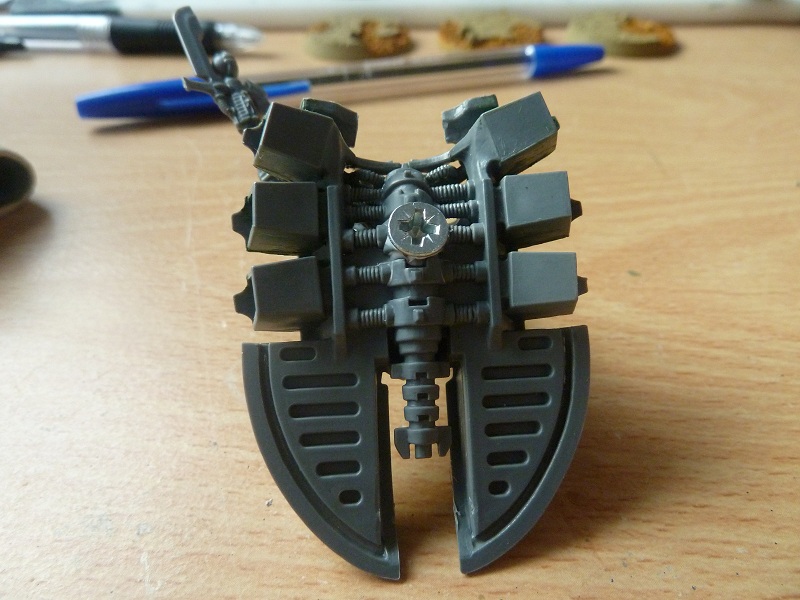
Good evening worshippers of the Plague Father and thank you for joining us again. Today I would like to offer up a simple alternative to the small flying bases from Games Workshop. I have made this as I have broken more than my fair share of these on Destroyers, Hammer Heads and Crisis Suits.


I was going to attach a magnet to the plastic rod but then I saw a set of Geomag toys on ebay for a couple of pounds which came with 36 rods and a large selection of ball bearings. The rod itself is a hard plastic with a rare earth magnet stuck in each end so you could easily make something similar yourself with a bit of dowel and a sunk magnet though with the cost of magnets alone I liked them.


I started by priming the rod black, as the ones I have are a mix of red, blue and yellow. I stuck this onto the plastic base with super glue as I wasn't sure how poly cement would behave with this type of plastic.


To attach it to the destroyer in this case I used a flat headed screw, if you go this route remember to check they are magnetic before attaching. You could easily swap this out for another magnet or a piece of steel rod which would work nicely and could be made to sit flush with the model if you attached it inside.

I have used this stand on my Destroyer Lord in a couple of games now and is has served me wonderfully compared to the standard ones I used to break on a regular basis.

Until next time keep spreading his word to every corner of the universe.

O'Shashar

Tuesday, September 18, 2012

Destroyer Lord Conversion


Good evening children of Grandfather Nurgle and thank you for joining us once again in our dark corner of the warp. Today I would like to offer up a simple conversion I made for my Destroyer Lord.

This has come about due to all my 6th edition games being 2v2 with a 1000 points each. So far I have been using my Destroyer Lord model I made when I first started playing around three years ago, back then he used to sit back with a Resurrection Orb and Staff of Light babysitting two squads of destroyers.


Recently I have been using him with a squad of Wraiths and he needs a Warscythe, my gaming group is pretty easy going with model representation as they like to try new things out regularly. As I did have a big rant on how this is making me lazy and not wanting to sound like a hypocrite I have been slowly building up the models I use with the correct  war gear to try and sort this out.


To start I picked up a new Destroyer kit and attached an Overlord that came with an Annihilation barge to the spine. This needed a bit of trimming on the cape as rather than extend it over the back I wanted to give it a short ragged appearance to represent how he was once a powerful leader before he became a destroyer aeons ago.


Rather than the standard Warscythe the Overlord came with I swapped it for the one handed version that comes with the Lychguard kit I have been using for Cryptek parts as is a bit more imposing.

Overall this is was a very simple conversion which could have been taken much further though I am happy with the outcome. Hopefully soon he should be looking good leading my Wraiths on the battlefield if my current resurgence of hobby motivation stays with me.


Until next time keep Nurgle close to your heart and you shall never falter.

Sunday, September 9, 2012

KR Multicase Review


Good evening children of Grandfather Nurgle and thank you for joining us again in our corner of his necrotic paradise. Today I am offering up a review of KR multicases Kaiser 4 case. As you can imagine with me picking up the Kaiser 4 this is not an unbiased reviewed as I already own a Kaiser 2, a Skirmish case and 5 additional card cases.

The Kaiser 4 is the largest in the Kaiser series and holds 4 of the cardboard cases to allow you to switch out what you bring rather than having to change the foam as you do in the aluminium cases. This case was bought for my Necrons though I originally planned to use my Kaiser 2 case with some new custom foam unfortunately I use a few flyers and barges and with  them not being as boxy as Imperial forces they take up significantly more room.


With the realisation I would need 4 card cases to hold what I owned and planned to purchase to expand my force I initially looked at buying 4 cases and a second Kaiser 2 bag but the difference was quite small cost wiseso for ease of transport I went with the larger bag. However I can only recommend this if you are moving about in a car as the case is 20" tall, 16.5" wide and 11" deep so is a bit bulky for walking or public transport. Luckily with the case being a tough fabric rather than solid plastic and being filled with card, foam and models it is still light enough to move once you get used to it being a giant lump of a case ( think two large GW cases taped together).

The material is hard wearing even with regular use, I picked up a Kaiser 2 when KR first started as a one man operation and it is still as good as new. It is waterproof and even protected the contents from a large chilli sauce covered kebab being dropped on it without a stain.


The card cases I was wary about at first but after years of being used the only sign of wear is on the hinge and this remains solid. The foam is much softer than what you find in GW's cases which lets you manipulate it to get large models such as Necron Overlords, Kroot and Saurus in without damaging their weapons.

You can take the pick and pluck rather than the custom foam to try and squeeze more in and while I did this with my Black Templars I felt more comfortable with the custom foam for Necron vehicles.

Overall I am a fan of these cases and do think they are worth the money, don't get me wrong they are not cheap but when you are transporting hundreds of pounds worth of models you have built and painted yourself I think it is better to invest in making sure they get to their destination safely.

Until next time keep spreading his gifts to the four corners of the universe.

O'Shashar

Wednesday, August 22, 2012

Bones Kickstarter Final Few Days


Good afternoon children of Nurgle and thank you for joining us today. Today I would like to point out that Reaper's kick starter project for Bones is in its last few days and they have smashed their targets and have thrown in a large amount of stretch goal models.

Myself and the Mighty Simo are going in at the Vampire level as you get an awful lot for your money ( even if you do have to wait until March ) and the reviews of the existing Bones range is positive.

If you want to get in on the action the project can be found here. What is included with the Vampire pledge is shown below and this doesn't include the extras you can add on.


Tuesday, August 7, 2012

Aegis Defence Line Work In Progress


Good evening children of the Plague Father and thank you for joining us once again in our pestilent paradise found deep within his garden of decay. Today I would like to present to you my progress on an Aegis Defence line I picked up before the latest price increase and with a 20% discount to boot so was a steal.


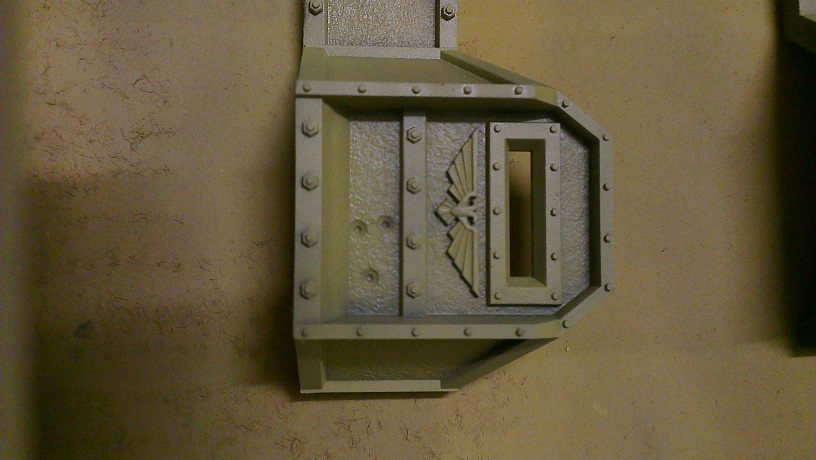
I planned to do a simple scheme on this and knock it out fairly swiftly as a test model for my airbursh. I started by priming it black then giving it a coat of Burnt Umber. Next I applied Yellow Ochre as when thinned down ( possibly too much ) it took on the colour of Desert Yellow however straight from the bottle it is much brighter.


From here I intended to hit it with a wash and then pick out the Aquila and I would be done but then disaster struck and I search for pictures of other Aegis Defence Lines for "inspiration" and found among the hordes done in the Games Workshop method I had intended to use I saw a beautiful example where the painter had picked out the reinforced sections and graffiti painted on.


Now this got me raiding the paint chest for a metallic colour to work against the flat panels and decided that copper would do the job nicely with it being such a warm looking metal for my desert board. After picking out the detail front and back then using Dhenab Stone for the Aquila I applied a Sepia wash.

Now this is where I have got to so far but real life has gotten in the way recently and posting and hobby time took a big hit. Hopefully I will be able to get back on track as this still needs the bullet holes darkening and possibly a soot effect adding to them and the panels giving a bit more depth  (not to mention the small matter of the autocannon that is sat waiting to be sprayed ).

Until next time keep spreading his noxious touch to all you meet.

O'Shashar

Wednesday, July 18, 2012

The Master's Brush Cleaner Review


Good evening and thank you for joining us once again in our dark corner of paradise. This week my offering to our Lord Nurgle is a review on the brush soap that was recommended to me after I reviewed my Winsor & Newton brushes.

I picked up a pot but until now I hadn't felt my brushes has seen enough action to deserve some special attention so this post has been a long time coming.

Recently I have been working on an Aegis Defence line I picked up in anticipation of sixth edition and the changes to the FOC, it also worked out well as a test for my airbrush. The terrain is coming along nicely and should hopefully have it done over the weekend ready to share with all you followers of Nurgle.

As I have been adding the reinforced areas by hand I noticed my brush was starting to lose the shape of its tip so I broke out the cleaner from my trusty paint chest and decided to have a cheeky read of the instructions to prevent me damaging my brush.

The instructions were pretty straight forward and consisted of rinsing your brush, working the block of soap into a lather and then repeating the process until clean. My only concern with this is the brush recommends to only clean with cold water so I used more of a tepid water to be on the safe side. I am not sure if it was due to this or if it was the because this was the first time I had used the soap but the lather just did not seem to form for a good minute or two.

After it being slow to form I wasn't expecting much from it however it quickly started to strip the red hue my brush that had acquired over time from my over use of Burnt Cadre Red. Once I repeated this a few times and gave it a proper rinse I was pleased with how much it had removed, most of which I hadn't even noticed had built up. The tip is also back with a strong tip and ready to be put back into the fray.

Overall I am happy with the results the soap gave and will be using it again, though I don't think it will be needed after every session it should prolong the life of my brushes. If you have treat yourself to a decent set of brushes I would recommend picking up this up to keep your brush in tiptop condition.

As for using it with cheaper brushes, such as my dry brushes I don't think any amount of soap can save them from the horrors they endure but that shouldn't deter you from trying.

Until next time spread his blessings to everyone you meet and all shall you know shall fall under his domain.

O'Shashar

Tuesday, July 10, 2012

O'Shashar's Misadventures With His Airbrush - Starting Out


Good evening and thank you for joining me once again in the Cupboard of Nurgle. Today I would like to talk to you about starting out with airbrushing and depending how much I learn as I go along this may become a regular series of tips. Now I am new to airbrushing so my tips will really only be good for people who have just started or are thinking about starting out.

Firstly I would recommend you ask yourself why you want an airbrush, it seems to be a bit of a stupid question but by asking myself this I had put this purchase off for a long time based on the knowledge that most of the painting I would do could be achieved with a paint brush. Personally I got an airbrush as I wanted to paint a large amount of terrain and vehicles as well as apply base coats in batches.

Once you have decided this is something you want to invest in it is time to either ask someone who knows about airbrushing miniatures at your local game club or search the internet for information. I went the internet route as I know a lot of people interested in airbrushing but like me have held off. The internet is full of useful information and differing points of view so try to read as much as you can to get an overall view of what's out there.

After my research I decided I would need the following:
  • Airbrush ( To start I got a cheap double action one to test with before I get the higher quality one I have my eye on purely so if this went badly I wouldn't have sunk too much money into it)
  • Compressor with an air tank ( to prevent pulsation in the air pressure and over heating )
  • Airbrush Holder ( I got a combined Airbrush holder & cleaning jar and has served me well )
  • Cleaning Tools
  • Cleaning Fluid
  • Moisture Trap
  • Respirator ( Acrylics are not toxic by nature and without the chemicals of propellant they are not as bad for you but I don't think breathing in something that is a nightmare to get off your hands is a good idea )
This is by no means a comprehensiveness list and if you find anything you feel will make your experience better go for it. You will also need to think of where you plan to spray as it will need to be well ventilated and spray booths to buy or build can be found online. A lot of people recommend buying a second needle for the brush as they are quite delicate and even a small bend can render them useless, I would like to add to this they are sharp enough so you won't feel them go stick in until you hit something solid.

So now you have your set up and are eager to get started you should stop and read the instructions for all the equipment you bought, now I know this goes against everyone's favourite method of trial and error but keep in mind that you have just spent a fair amount of money on equipment you haven't used before and there is a good chance something is going to go wrong.


Once you are familiar with the instructions you want to disassemble and reassemble your airbrush a few times to make yourself comfortable with doing this for cleaning. I did not do this and while using my airbrush I took the needle out to clean it causing me to flood it all with paint. Due to this I had to disassemble it, coated in paint and with no idea how it went back together I do not recommend that to anyone.

Next time I will be talking about using your Airbrush for the first time, paint choices and all the fun and failures I have experienced so far.

Until then keep spreading his gifts to all you encounter in your travels through the warp.

O'Shashar

Tuesday, July 3, 2012

Painting Resolutions For Sixth Edition


Good evening travellers of the warp and thank you for joining me once again in our dark corner of the infinite abyss. I apologise that I have not posted recently and would like to thank Mighty Simo for picking up the slack for me. My offering today is more of a catchup and my plans for sixth edition and my war gaming in general so will be a wall of text ( yes more than usual ) so if this doesn't sound like your cup of tea I won't be offended if you catch the next portal out of here.

As sixth edition was approaching I found myself at a bit of a lull in motivation so decided to look through my rather sizeable collection of unfinished projects and decided that I wanted to get back to where I was when I started with war gaming in fifth.

My original Necron force, with the awakening of the Tomb Worlds this has more than doubled in size

As unbelievable as this is with my track record of slacking off when I first started I picked up my Necrons and before I had my first game with them they were fully painted as well as being based. I am not going to try and convince you all this was the greatest painting ever but compared to the the grey Tyranids I was facing it made them look more like an army.

However the group I learnt with didn't play the missions and was literally we played until someone was wiped out so this lead to a lot of tailored lists and different units on a per game basis. As you can imagine this pattern lead me to doing the same. Unfortunately this lead to no units being used often enough to justify painting.


In this time I also obtained two AOBR marine forces, a large Space Wolf army and a mid sized T'au army to help a friend who decided 40k wasn't for him and would rather play Flames of War get out of it. The Space Wolves were stripped back to the metal / plastic and anything with Space Wolf feel to it was redistributed to our resident Space Wolves player and anything else was inducted into my Templar army ( This was at the time of the new codex and despite their amazing power Black Templars just resonate with me so won out ). The T'au along with two further small T'au forces and purchases by myself became my current T'au army.

1750 points worth of my T'au after they trekked to Maelstrom for the first Blogwars

In the end has left me in the situation I am now with a large T'au, Black Templar and Necron forces as well as a couple of battle forces for Imperial Guard. As you can imagine this isn't where my addiction ends and I also have random kits for different armies, two fantasy armies and an assortment of stand alone figures.

Now I can quickly admit this is not a good place to be and have drastically cut my spending in this area but I know this isn't going to be enough as I have said this before and  I love the new stuff that is release from different companies and eventually I will break and start buying again.

My solution to this is hopefully the drive to play more games with painted models and with that in mind I plan to keep focus on my Necrons as they are the newest of my armies with the recent refresh and I enjoy using them. Along with them I may try to paint some Imperial Guard up for games with allies.

Now I am a slow painter so have picked up an airbrush and is what I have been doing since my last post. I have mainly been practicing on boxes and old models so nothing exciting I can post currently though I have started an Aegis Defence line and while I am not 100% happy with it so far I can see the potential for this tool if I can get good with it.

As this is probably going to take up what little free time I seem to have these days my posts will probably reflect this so am going to chronicle my experiences to try and help anyone else who is on the fence as so far it has been frustrating as I have learnt a lot by trial and error though despite this I am confident this will help me reach my goal.

For added motivation Mighty Simo never fails to roll out fully painted and awesome looking armies when I face him and Dalinair is making good strides on his Blood Angels so it is time for me to get back in the Earth Castes machine shops.


If you're still with me after this wall of text I salute you as the truly devoted followers of Nurgle and offer you a fist bump from this internet cat.

For those of you wanting an abridged version it is basically I bought too much to keep competitive with my gaming group which used heavy model repping and now am snowed under so have bought an airbrush to try and help me out as I am annoyed at myself for getting like this.

Until next time take head and learn from my mistakes or join me in an unassembled & unpainted hell from which there is little chance of escape.

O'Shashar

Saturday, June 16, 2012

Necron Night Scythe Update


Good afternoon and thank you for joining us in our twisted paradise once again. Today my offering to our Lord Nurgle is a work in progress update for my Night Scythe. As I was working with metallics I started by priming it black.


Following that I gave a liberal coating of Tin Bitz, at this point I did feel that the partial build would have been much better as certain parts begged me to destroy a brush just to get to them. Sadly this colour has been discontinued by Games Workshop but luckily for my Necrons Vallejo do a version called Tinny Tin in their Game Colour range along with a lot of the now discontinued colours from Games Workshop.


Lastly I painted two of the wing sections in Burnt Cadre Red ( without this colour I would be lost as I sneak it into all my armies ) which is on the top, bottom and sides. The engines, vents and the parts between the wings got treated to Vallejo Brass.


In keeping with the warriors I posted a while back I plan to add a mix of Tin & Boltgun to the Tin sections, a few more coats on the red for a smooth finish before highlighting up, dull the brass sections down and then I can try my hand at some gem effects.

Until next time do not run from those of your number which are infected, for they carry his blessings to you.

O'Shashar


As an extra bonus for you today I recommend you visit TheFrontlineGamer here. He is having a massive give away to bring in fresh blood to his blog. While you are there for the free stuff it is worth a look through his archives as he does put out a lot of good work on a regular basis.

This time he is giving away $100 store credit for Dragon Forge bases and I for one recommend these bases whole heartedly. You can read my review of them here and TheFrontlineGamer has done a couple himself.

Tuesday, June 5, 2012

Thunder Wolf Cavalry Voting


Good afternoon children of  the Plague Father and thank you for joining me here today. This post is long overdue but was delayed due to real life issues slowing down the final model being completed. All three wolves have now been posted and now it is time for me to ask all you Nurglings to please vote for which version you prefer so our glorious winner can pick the next model we paint.

To refresh your memories here they are again...


First up is Dorn's Arrow's with his full post found here.


Next is Mighty Simo's offering with his post here.


And lastly is my own Thunder Wolf and my post.

The posts I have linked to continue more pictures of each as I just chose my favourite shot of each. Voting will be at the top of the page for the next few weeks and I thank you all for taking the time to help us decide on a winner.

Until next time may our Lord's dark gaze fall upon you.

O'Shashar

Monday, June 4, 2012

Necron Night Scythe Kit Review


Good afternoon and thank you for joining us again in the dank darkness that is the Cupboard of Nurgle. Today I am reviewing the latest addition to the Necron forces that have made available to enslave the mortal races.

From the moment I saw the first pictures I knew that I would be adding one to my collection, as this is the first model that has made me want to avoid logging onto Diablo 3 and slaying demons to steal their treasure ( any saving of innocent lives is merely a side effect of my greed ). With this in mind I took a trip to the local game store in the hope they had one left for me to get my mitts on. I was glad to see that they had ordered in twice as many Necron ones as they had the Ork or Marine variety ( maybe they guessed I would be wanting at least one ).


The first thing I noticed was that the box of the Night Scythe is the same size as a Rhino but the other two are Landraider box size which I understand for the Ork plane as it looks like you get a nice sized model for your money but the Storm Talon just doesn't seem meaty enough to warrant it.


I cannot say how happy it made me to see that this kit only came on two large sprues rather than the three the Ghost Ark came on. As I looked over it I knew this was more like the kits I want, by this I mean while I like variety and the odd extra piece is nice I hate it when you can get exactly the same end result in 5 pieces but it is done in 50 ( separate necks on Necron models I am looking at you ).

This model was a breeze to build and more surprisingly I actually enjoyed it rather than the uphill struggle that was the Ghost Ark. I was so engrossed in my work that rather than keep it in separate parts to paint ( which I would recommend as you can see below the pilot is well caged in ) I just kept going and before I knew what was happening I was at the stage were I needed to magnetise the guns.


Now I could show you how I did it but the method I used was the excellent work done by Nick over at IDICBeer 40k who has done this and others which I recommend having a look at if you are looking at magnetising Necron Vehicles. The only change I would recommend is to make the cut on the tabs of the Tesla Destructors down to the height of both magnets to give a better fit as the plastic in the groove is quite thin which makes it hard to sink the magnets.

I understand that people seem split on its usefulness in games and I admit I haven't tried one yet as they do seem a touch fragile with them being denied the +2 Av shields. Though with all the rumours of sixth edition coming it may become a true flyer and its popularity change and see everyone rolling out six of these reasonably priced models out in games.

My only complaint is with the large flying stand and it is that it needs a little encouraging to be put in or taken out. However as I don't have any other models on the large flying stand I couldn't say if this is by design or not.

Overall I love this model and I am currently waiting for my primer to dry as I type this post up. Now this isn't usually the case for me so I want to strike while the iron is hot before my motivation to paint lulls. Hopefully I should have a progress report on this shortly and have another model completed towards my goal for the year before too long.

Until next time spread the blessings of our Lord Nurgle to everyone you encounter in these times of strife.

O'Shashar

Monday, May 14, 2012

O'Shashar's Finished Thunderwolf


Good afternoon and thank you for joining me once again in our pestilent corner of his garden. Today I bring to you my Thunder Wolf Cavalry model. I have tried to go for a darker look more in line with the pre heresy colours as I am not a fan of the GW bright Space Wolf colours.

The model had a nice amount of parts while not being quite as intense a build as my Necrons have been lately so was a nice change of pace, though I am disappointed the head came in multiple parts as left quite a clear triangle on the face of my wolf. I tried liquid greenstuff on it but still shows through a little.


The armour I started with Vallejo black grey followed by a black wash and highlights with German grey however these don't appear to have shown up very well in the photos. The metal trim was done using a base of beastial brown followed by a 2:1 mix of Tin Bitz and Vallejo Brass. The Yellow shoulder was done with foundation yellow built up to Bad Moonz Yellow, while the red was Burnt Cadre Red built up to Flat Red both were given a black freehand symbol ( which for my first try at freehand I don't think well too badly). The bone tailismans were built up from snake bite leather to rotting flesh and then given a sepia wash.


I decided to go for a white wolf to balance out the dark armour, I did this using foundation granite, beastial brown, rotting flesh, a sepia wash then a second pass with rotting flesh. I did try to use ivory but this was too white for my tastes. The metal sections I did in the same way as the marine to tie them together.


As I have no plans to play Space Wolves I decided to give my wolf a rocky base which I carved out of a piece of high density pink foam. I started painting it with Fenris Blue followed by Space Wolves Grey, Codex Grey and a final pass with Fortress Grey.

I hope you all like my Thunder Wolf, Fenrir and his Rider Olaf the Grey and any comments or criticism are welcome.

Until next time keep spreading his plagues and poxs to all you encounter.

O'Shashar


Wednesday, May 9, 2012

The Cupboard Of Nurgle Is One Year Old


Greetings once again fellow travellers of the infinite expanse of the warp. Today I am please to announce that our humble corner of Lord Nurgle's domain has reached one year of blogging and I have to say I am happy with the progress we have made though we still have a long way to go if we want to get as many comments as the big boys out there.

Looking back over the year I am happy with the progress we have made. We have managed regular posting on a combination of reviews and painting ( even though my painting is much slower going than Mighty Simo the painting machine ). It has been a team effort and I know I couldn't have done this without my two fellow bloggers, Mighty Simo & Dorn's Arrow.

We would like to thank all the people who take the time to read our posts, add comments and become followers. I would also like to take this time to ask if there is anything you would like to see more of on the blog such as Mighty Simo doing some step by step guides, more reviews or even more variety in our painting?

If painting is what you want out of us you're in luck as our Thunder Wolves are finished and ready to be posted so expect to see those over the next few days as well as a poll to vote for which you prefer ( and if you send us a picture of yours with your username in the picture we will post those up too).

Until next time

O'Shashar

Monday, May 7, 2012

A Necron Ghost Ark Model Review


Good evening minions of the pestilent one and thank you for joining me once again in the dark recesses of his domain. I apologise that we have not made many offerings of late, this is down to playing 40k & Warhammer Quest as well as working on my Thunder Wolf Cavalry model for the 9th.

As part of building my Necron force I have recently confronted the Ghost Ark model and it is a beast. This is a review on my experience of building the Ghost Ark kit and not a review of its use in game.

When I unboxed the kit it came on three large sprues that were crammed with parts and each part was numbered which concerned me a little as while I like large amount of parts I personally feel the Necrons seem to have gone the path of "forced dynamic poses" where if you only have 5 models then it is ok as they all have a different pose. Though when you get a few kits together you have the same 5 poses repeated unless you spend time converting them to be different as part A must go with part B and never mixed with C.


Now as I got into it my fears were confirmed as while there were some repeat parts things such as the Warriors in the racks had different harness numbers which didn't look any different at a casual glance though at least their necks were attached unlike the pilot. This may seem a small thing but why have a 3mm cubed piece of plastic not attached to body?

I was impressed with the amount of parts and the clear instructions it came with which have improved significantly from the warrior instructions on the side of the battle force. However these improved instructions have the warning signs that this is a model first and a game piece second as there are multiple stop points which suggest you paint what you have assembled so far.

They are sensible places to stop such as painting the warriors before placing on the ship though one is part way through building the helm. So you need to make a decision as to if you want to make sure this is painted up while you have ease of access or if you want to use the £30+ transport. This way lead to a new era of buying one model and painting it before using it and I sincerely hope it does but I for one kept I have mine in two sections to paint while still being usable in the mean time.

Please do not get me wrong this is not a bad thing as on models such as Rhinos if it said "stop to paint the inside before glueing the roof on" there would be less glued shut in anger are not being able to paint the console how they wanted.

Overall this is a very good model kit and unfortunately I feel that means you do need to treat it as you would any other model rather than a game piece and paint it before you use it otherwise you'll have difficulty getting to the fiddly parts and there are a lot of them. Also it comes on the old style flying bases which break too easily and it is not a small model being closer to a Land Raider than a Rhino foot print wise due to length and the outward facing flayers.

Until next time drink deep from the cauldron of Nurgle and accept his blessings into your life.

O'Shashar

Monday, April 23, 2012

Single Model Painting Challenge - Thunder Wolf Cavalry


Good evening children of the plague father and thank you for joining us once again in our corner of the warp. Following on from my last post which mentioned we were planning to start single model painting challenge on a regular basis ( better ideas for the name are welcome ).

The model we have chosen this time is the Games Workshop Thunder Wolf Cavalry so this will give us similar models to work with but they won't be identical due to the pack being made up of three different wolves and riders.

We now all have our models assembled and I managed to prime my own yesterday along with my three Crypteks in between the lovely April showers it is time to put a time frame to be finished by.

After speaking with my fellow bloggers we have decided that May the 9th should be the end of the challenge as is the Cupboard of Nurgle's first birthday which isn't bad for a blog we only started because Mighty Simo said we really should have a blog if we were going to Blogwars.

Until next time continue to drink deeply from the cauldron of pestilence.

O'Shashar

Friday, April 13, 2012

Necron Work In Progress Round Up


Good evening followers of the pestilent one and thank you for joining me once again. As I mentioned in my last post I am considering getting a ticket for Blog Wars 3 as I had a good day with my T'au last year but want to take my Necrons.

As such I have ignored posting a bit to make a start on getting the models built up. So far I have assembled a Ghost Ark, Annihilation Barge, the Crypteks from my last post and a lord. I also have made a start on some Immortals and cleaning up some wraiths I managed to trade off of Mighty Simo. The list I have tried and made a few tweaks with though I still think it will need work due to me only have 3 or 4 games of 40k with the new codex.

I imagine from my limited experience with the army and lack of 40k in general of late that I will probably do quite poorly at Blogwars but someone has take home that tasty wooden spoon trophy.

Sorry for the lack of pictures but this week has been pretty hectic for me and spent my free time building has left me a bit drained. The Ghost Ark is a nice model which I will be reviewing as a model to build over the next week as well as trying to get more of my army built up and based so I can work on the painting.


However it isn't all Necrons all the time for me as after painting our Nurgle Lords together it got Mighty Simo and myself talking about seeing if we could make this a regular thing so we can try our hands at different models from armies we don't play and it seems like it could be a lot of fun ( at least until I have to paint then I might have second thoughts ).

As his Nurgle Lord garnished the most votes he was granted the honour of picking our first model and then we will take it in turns to pick. After a lot of head scratching he has chosen to paint the Space Wolf Thunder Wolf Cavalry which just so happens to come in a handy box of three models.

This tied in well with our FLGS having a 20% discount on so I picked up a box of these terrible beasts, chose my favourite and the war gear I wanted and have passed the rest on to my fellow bloggers. We haven't set a time frame for these yet but should have more information posted in the near future.

Until next time keep pestilence close to your heart and it will be your lone companion in the darkness.

O'Shashar