Showing posts with label Warhammer 40000. Show all posts

Sunday, October 7, 2012

Crashed Aquilla Lander Completed


Good afternoon and thank you for joining us again at Nurgle favored cupboard. Now firstly I will apologise for being away for some time now, but some as you know I have had an entire house to decorate and let me tell you it is not fun. Most of that has now been done and the time I have had I have finished my crashed Aquilla lander.


I purchased  some Vallejo gloss varnish to paint over the glass sections once I had finished protect coating the piece with Army Painter's Matt Varnish spray. I think the end result has turned out rather well and I am pleased with the 'glass' effect I achieved  The only thing I don't like is the 'smiling faces' you will see in image below. It almost as if a lone guardsmen survived the crash and is beaming a smile outwards from the glass. 'Haha! You didn't kill me. The emperor is watching over me!'. Also as you can see below I ended up going for a golden Aquilla rather then the white one I was deliberating over.


On another note I picked up my new shiny Chaos codex today. The sultry voices from the warp are already calling me to read it entirely and decide what to buy from the new stuff, which will be hard because it all looks amazing! The new style of codex is awesome though and it well worth the extra cost. I have one of the new fantasy hardback books and they feel more sturdy.

Until the next time you grace Nurgle's favored cupboard, may Nurgles blessings fall on you.


Saturday, September 29, 2012

Replacement Flying Bases


Good evening worshippers of the Plague Father and thank you for joining us again. Today I would like to offer up a simple alternative to the small flying bases from Games Workshop. I have made this as I have broken more than my fair share of these on Destroyers, Hammer Heads and Crisis Suits.


I was going to attach a magnet to the plastic rod but then I saw a set of Geomag toys on ebay for a couple of pounds which came with 36 rods and a large selection of ball bearings. The rod itself is a hard plastic with a rare earth magnet stuck in each end so you could easily make something similar yourself with a bit of dowel and a sunk magnet though with the cost of magnets alone I liked them.


I started by priming the rod black, as the ones I have are a mix of red, blue and yellow. I stuck this onto the plastic base with super glue as I wasn't sure how poly cement would behave with this type of plastic.


To attach it to the destroyer in this case I used a flat headed screw, if you go this route remember to check they are magnetic before attaching. You could easily swap this out for another magnet or a piece of steel rod which would work nicely and could be made to sit flush with the model if you attached it inside.

I have used this stand on my Destroyer Lord in a couple of games now and is has served me wonderfully compared to the standard ones I used to break on a regular basis.

Until next time keep spreading his word to every corner of the universe.

O'Shashar

Tuesday, September 18, 2012

Destroyer Lord Conversion


Good evening children of Grandfather Nurgle and thank you for joining us once again in our dark corner of the warp. Today I would like to offer up a simple conversion I made for my Destroyer Lord.

This has come about due to all my 6th edition games being 2v2 with a 1000 points each. So far I have been using my Destroyer Lord model I made when I first started playing around three years ago, back then he used to sit back with a Resurrection Orb and Staff of Light babysitting two squads of destroyers.


Recently I have been using him with a squad of Wraiths and he needs a Warscythe, my gaming group is pretty easy going with model representation as they like to try new things out regularly. As I did have a big rant on how this is making me lazy and not wanting to sound like a hypocrite I have been slowly building up the models I use with the correct  war gear to try and sort this out.


To start I picked up a new Destroyer kit and attached an Overlord that came with an Annihilation barge to the spine. This needed a bit of trimming on the cape as rather than extend it over the back I wanted to give it a short ragged appearance to represent how he was once a powerful leader before he became a destroyer aeons ago.


Rather than the standard Warscythe the Overlord came with I swapped it for the one handed version that comes with the Lychguard kit I have been using for Cryptek parts as is a bit more imposing.

Overall this is was a very simple conversion which could have been taken much further though I am happy with the outcome. Hopefully soon he should be looking good leading my Wraiths on the battlefield if my current resurgence of hobby motivation stays with me.


Until next time keep Nurgle close to your heart and you shall never falter.

Saturday, September 15, 2012

Crashed Aquila Lander Almost Complete


Hello and good afternoon fellow travelers of the warp and worshipers of Nurgle. I thought I would update you all on my crashed Aquila lander. I should have it finished by the end of this weekend. All I have left to do is the Aquila, which I am torn between doing in white or gold and a scanner next to the cockpit. Other then that I just have to touch up a few bits here and there, protect spray it and then gloss varnish the glass.


I have never painted glass before so I spent a few hours browsing the webt and found a simple tutorial over at Dave Taylor Miniatures. I think it has turned out rather nicely. Once I have my lander done I have just finished priming 10 cultists fro mthe new Dark Vengence box set and I can't wait to get stuck into them.

Unfortunately that is all I have for you all this week, may Nurgle's blessing forever be in your favor.

Tuesday, September 4, 2012

Crashed Aquila Lander WIP


 Good afternoon everyone and thank you for joining us again at Nurgle's favoured Cupboard. I apologise for the lack of updates from myself. I have been extremely busy sorting out my house the last few weeks. Any way I have been doing some work on my Crashed Aquila Lander while I can and I am not far off from having it finished. The picture isn't as good as I hoped as I didn't have anywhere nice to take it so I had to cram it into my light box. Once it is I will make sure I have another picture for you all.


On a side note I picked up my limited edition copy of Dark Vengence, I have to say that the miniatures are amazing. The next thing I am going to paint is 10 of the cultists for the box set. I just have to decide on whether to do the ones with the Autoguns or the ones with the ones with close combat weapons and Auto pistols. If anyone has any preferences let me know.

And that's all for today from the lusciously deceased garden of our beloved Plague Father.

Tuesday, August 7, 2012

Aegis Defence Line Work In Progress


Good evening children of the Plague Father and thank you for joining us once again in our pestilent paradise found deep within his garden of decay. Today I would like to present to you my progress on an Aegis Defence line I picked up before the latest price increase and with a 20% discount to boot so was a steal.


I planned to do a simple scheme on this and knock it out fairly swiftly as a test model for my airbursh. I started by priming it black then giving it a coat of Burnt Umber. Next I applied Yellow Ochre as when thinned down ( possibly too much ) it took on the colour of Desert Yellow however straight from the bottle it is much brighter.


From here I intended to hit it with a wash and then pick out the Aquila and I would be done but then disaster struck and I search for pictures of other Aegis Defence Lines for "inspiration" and found among the hordes done in the Games Workshop method I had intended to use I saw a beautiful example where the painter had picked out the reinforced sections and graffiti painted on.


Now this got me raiding the paint chest for a metallic colour to work against the flat panels and decided that copper would do the job nicely with it being such a warm looking metal for my desert board. After picking out the detail front and back then using Dhenab Stone for the Aquila I applied a Sepia wash.

Now this is where I have got to so far but real life has gotten in the way recently and posting and hobby time took a big hit. Hopefully I will be able to get back on track as this still needs the bullet holes darkening and possibly a soot effect adding to them and the panels giving a bit more depth  (not to mention the small matter of the autocannon that is sat waiting to be sprayed ).

Until next time keep spreading his noxious touch to all you meet.

O'Shashar

Saturday, July 14, 2012

Crashed Aquilla Lander WIP


Hello and good day to you all. Welcome back to Nurgle's favoured cupboard. I apologise for the lack of posts by myself I have not been captured by the Inquisition I been lurking in the shadows. All my spare time is currently being pumped into my new home. I am on my way over later for round two of wall paper stripping. I can tell you for those that have never done this that it is one of the most pain the ass things you can do. Maybe I have upset Papa Nurgle and it is punishment. If it is I hope this offering to him will reduce my suffering.

In the time I have had for my beloved hobby I decided instead of painting something small I would go for a larger piece. This is because I am unsure when I will be moving stuff over to my new domain and I wanted some easy to pick up as I often find that if I take large breaks in painting models I either misplace them or I forget what I was doing last or what colour I was highlighting.


The piece I am currently working on is Crashed Aquilla Lander from the Battle For Macragge. I picked this beauty up from eBay for about £7 a long time ago already sprayed and with a basecoat of Machrite Red. I have just finished going over the Machrite Red with Orkhide Shade as I wanted the Aquilla Lander to look like it was used for military purposes in an Imperial Guard regiment for a high commander or something.

So it's not much this week but I will give you another work in progress when I get some more done on it. Until next time I hope Father Nurgle is kinder with his blessings to you all.

Saturday, June 16, 2012

Necron Night Scythe Update


Good afternoon and thank you for joining us in our twisted paradise once again. Today my offering to our Lord Nurgle is a work in progress update for my Night Scythe. As I was working with metallics I started by priming it black.


Following that I gave a liberal coating of Tin Bitz, at this point I did feel that the partial build would have been much better as certain parts begged me to destroy a brush just to get to them. Sadly this colour has been discontinued by Games Workshop but luckily for my Necrons Vallejo do a version called Tinny Tin in their Game Colour range along with a lot of the now discontinued colours from Games Workshop.


Lastly I painted two of the wing sections in Burnt Cadre Red ( without this colour I would be lost as I sneak it into all my armies ) which is on the top, bottom and sides. The engines, vents and the parts between the wings got treated to Vallejo Brass.


In keeping with the warriors I posted a while back I plan to add a mix of Tin & Boltgun to the Tin sections, a few more coats on the red for a smooth finish before highlighting up, dull the brass sections down and then I can try my hand at some gem effects.

Until next time do not run from those of your number which are infected, for they carry his blessings to you.

O'Shashar


As an extra bonus for you today I recommend you visit TheFrontlineGamer here. He is having a massive give away to bring in fresh blood to his blog. While you are there for the free stuff it is worth a look through his archives as he does put out a lot of good work on a regular basis.

This time he is giving away $100 store credit for Dragon Forge bases and I for one recommend these bases whole heartedly. You can read my review of them here and TheFrontlineGamer has done a couple himself.

Tuesday, June 5, 2012

Thunder Wolf Cavalry Voting


Good afternoon children of  the Plague Father and thank you for joining me here today. This post is long overdue but was delayed due to real life issues slowing down the final model being completed. All three wolves have now been posted and now it is time for me to ask all you Nurglings to please vote for which version you prefer so our glorious winner can pick the next model we paint.

To refresh your memories here they are again...


First up is Dorn's Arrow's with his full post found here.


Next is Mighty Simo's offering with his post here.


And lastly is my own Thunder Wolf and my post.

The posts I have linked to continue more pictures of each as I just chose my favourite shot of each. Voting will be at the top of the page for the next few weeks and I thank you all for taking the time to help us decide on a winner.

Until next time may our Lord's dark gaze fall upon you.

O'Shashar

Monday, June 4, 2012

Necron Night Scythe Kit Review


Good afternoon and thank you for joining us again in the dank darkness that is the Cupboard of Nurgle. Today I am reviewing the latest addition to the Necron forces that have made available to enslave the mortal races.

From the moment I saw the first pictures I knew that I would be adding one to my collection, as this is the first model that has made me want to avoid logging onto Diablo 3 and slaying demons to steal their treasure ( any saving of innocent lives is merely a side effect of my greed ). With this in mind I took a trip to the local game store in the hope they had one left for me to get my mitts on. I was glad to see that they had ordered in twice as many Necron ones as they had the Ork or Marine variety ( maybe they guessed I would be wanting at least one ).


The first thing I noticed was that the box of the Night Scythe is the same size as a Rhino but the other two are Landraider box size which I understand for the Ork plane as it looks like you get a nice sized model for your money but the Storm Talon just doesn't seem meaty enough to warrant it.


I cannot say how happy it made me to see that this kit only came on two large sprues rather than the three the Ghost Ark came on. As I looked over it I knew this was more like the kits I want, by this I mean while I like variety and the odd extra piece is nice I hate it when you can get exactly the same end result in 5 pieces but it is done in 50 ( separate necks on Necron models I am looking at you ).

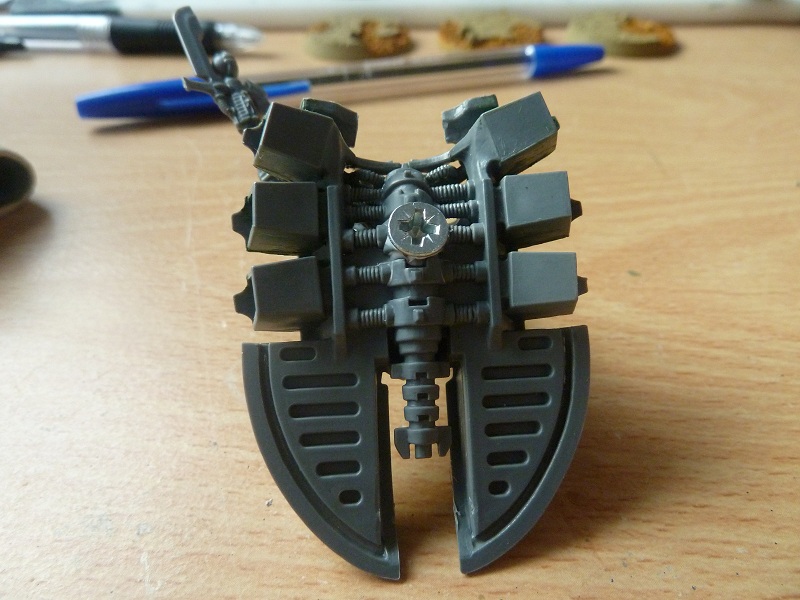
This model was a breeze to build and more surprisingly I actually enjoyed it rather than the uphill struggle that was the Ghost Ark. I was so engrossed in my work that rather than keep it in separate parts to paint ( which I would recommend as you can see below the pilot is well caged in ) I just kept going and before I knew what was happening I was at the stage were I needed to magnetise the guns.


Now I could show you how I did it but the method I used was the excellent work done by Nick over at IDICBeer 40k who has done this and others which I recommend having a look at if you are looking at magnetising Necron Vehicles. The only change I would recommend is to make the cut on the tabs of the Tesla Destructors down to the height of both magnets to give a better fit as the plastic in the groove is quite thin which makes it hard to sink the magnets.

I understand that people seem split on its usefulness in games and I admit I haven't tried one yet as they do seem a touch fragile with them being denied the +2 Av shields. Though with all the rumours of sixth edition coming it may become a true flyer and its popularity change and see everyone rolling out six of these reasonably priced models out in games.

My only complaint is with the large flying stand and it is that it needs a little encouraging to be put in or taken out. However as I don't have any other models on the large flying stand I couldn't say if this is by design or not.

Overall I love this model and I am currently waiting for my primer to dry as I type this post up. Now this isn't usually the case for me so I want to strike while the iron is hot before my motivation to paint lulls. Hopefully I should have a progress report on this shortly and have another model completed towards my goal for the year before too long.

Until next time spread the blessings of our Lord Nurgle to everyone you encounter in these times of strife.

O'Shashar

Monday, May 28, 2012

Dorn's Arrow's Finished Thunderwolf


Greetings fellow followers of the Plague God. On Friday I finally finished my Thunderwolf (sorry about the delay, its been a very busy couple of weeks).


This was a fantastic opportunity to try out some new techniques (I have never painted that much fur),  and just a great chance to paint one of the Sons of Ruus. For the wolf I wanted to base the colours on those on the front of the box, and so went for a striped wolf of greys and browns, with a blend into a khaki highlight to tie the colours together naturally. I also wanted to go with a snowy base and so this was the first model I have tried modelling snow on and am quite pleased with the way the wolf and base go together as though its a natural habitat.


The kit was great with lots of options. Being a Crimson Fists player, there is just something in me which screams "grab the power fist!" So I did. Assembling the kit did take a while as Mighty Simo mentioned in his post, but the resulting pose is really dynamic and there were so many options no one really had to surrender any items they wanted to use.


To paint the marine I followed the tips in a recent white dwarf (with the old paints) although I added a few layers between the basecoat and edge highlight to blend the armour colours a bit more. Adding battle damage was also a first for me, and I am really pleased with the effect.


And one of the reasons I'm so late with the Thunderwolf is that I was halfway through another batch of 5 Stormvermin for the Tale of X Gamers. So there they are. On other news, its my birthday today, and my girlfriend bought me the 'How to Paint Citadel Miniatures' book and DVD, so I'm very pleased (and impressed) and am about to crack on with some more slave rats for my list. So until next time, let the father's blessings of filth be with you all.

Monday, May 14, 2012

O'Shashar's Finished Thunderwolf


Good afternoon and thank you for joining me once again in our pestilent corner of his garden. Today I bring to you my Thunder Wolf Cavalry model. I have tried to go for a darker look more in line with the pre heresy colours as I am not a fan of the GW bright Space Wolf colours.

The model had a nice amount of parts while not being quite as intense a build as my Necrons have been lately so was a nice change of pace, though I am disappointed the head came in multiple parts as left quite a clear triangle on the face of my wolf. I tried liquid greenstuff on it but still shows through a little.


The armour I started with Vallejo black grey followed by a black wash and highlights with German grey however these don't appear to have shown up very well in the photos. The metal trim was done using a base of beastial brown followed by a 2:1 mix of Tin Bitz and Vallejo Brass. The Yellow shoulder was done with foundation yellow built up to Bad Moonz Yellow, while the red was Burnt Cadre Red built up to Flat Red both were given a black freehand symbol ( which for my first try at freehand I don't think well too badly). The bone tailismans were built up from snake bite leather to rotting flesh and then given a sepia wash.


I decided to go for a white wolf to balance out the dark armour, I did this using foundation granite, beastial brown, rotting flesh, a sepia wash then a second pass with rotting flesh. I did try to use ivory but this was too white for my tastes. The metal sections I did in the same way as the marine to tie them together.


As I have no plans to play Space Wolves I decided to give my wolf a rocky base which I carved out of a piece of high density pink foam. I started painting it with Fenris Blue followed by Space Wolves Grey, Codex Grey and a final pass with Fortress Grey.

I hope you all like my Thunder Wolf, Fenrir and his Rider Olaf the Grey and any comments or criticism are welcome.

Until next time keep spreading his plagues and poxs to all you encounter.

O'Shashar


Friday, May 11, 2012

Mighty Simo's Thunderwolf Completed


Hello and good afternoon to you all. As you may remember on 9th May we celebrated our first birthday here at Cupboard of Nurgle. Earlier this month we said we would celebrate with a single model painting challenge. Seeing as I got the most votes for our Nurgle Lord painting competition I had the honor of choosing the model we would paint. After some thought and some whispering in my ear by Dorn's Arrow I chose the recently released Thunderwolf Cavalry.

The multi-part plastic kits conveniently comes with models so that we had one each. I have to admit the kit itself is amazing with a wide range of options. My one gripe is that the model is not easy to put together. The wolf I used came in 11 different pieces, 12 if you count the saddle! It took me about 2 hours to assemble the model. I would suggest to people to leave the wolf and rider separate to make is easy to paint the model. If you choose the storm shield also keep this separate.

For the All Father!


If you would like to know how to paint your Thunderwolf Cavalry like this pick yourself up a copy of White Dwarf issue 387. I basically followed the painting guide in there. The only change I did was on the Space Wolf armor. The guide suggests a wash of Devlin Mud after the basecoat and then layering the basecoat. Instead I started with shadow grey, layers with a 50/50 mix of Shadow Grey and Space Wolves Grey. I then highlighted with pure Space Wolves Grey followed by a 50/50 mix of bleached bone and Space Wolves Grey.

I don't think I would fancy seeing this in front of me.


O'Shashar and Dorn's Arrow should have their Thunderwolves posted up in the next few days and we welcome our faithful followers to send in pictures of their Thunderwolves. We will then have a vote to see who has the best painted model.

That's all I have for you this week our follower minions of Nurgle. However, on one of my earlier posts I mentioned that I have another five of my Night Goblins done, which I hope to share with you all soon. May Nurgle's blessings fall upon you.

Monday, May 7, 2012

A Necron Ghost Ark Model Review


Good evening minions of the pestilent one and thank you for joining me once again in the dark recesses of his domain. I apologise that we have not made many offerings of late, this is down to playing 40k & Warhammer Quest as well as working on my Thunder Wolf Cavalry model for the 9th.

As part of building my Necron force I have recently confronted the Ghost Ark model and it is a beast. This is a review on my experience of building the Ghost Ark kit and not a review of its use in game.

When I unboxed the kit it came on three large sprues that were crammed with parts and each part was numbered which concerned me a little as while I like large amount of parts I personally feel the Necrons seem to have gone the path of "forced dynamic poses" where if you only have 5 models then it is ok as they all have a different pose. Though when you get a few kits together you have the same 5 poses repeated unless you spend time converting them to be different as part A must go with part B and never mixed with C.


Now as I got into it my fears were confirmed as while there were some repeat parts things such as the Warriors in the racks had different harness numbers which didn't look any different at a casual glance though at least their necks were attached unlike the pilot. This may seem a small thing but why have a 3mm cubed piece of plastic not attached to body?

I was impressed with the amount of parts and the clear instructions it came with which have improved significantly from the warrior instructions on the side of the battle force. However these improved instructions have the warning signs that this is a model first and a game piece second as there are multiple stop points which suggest you paint what you have assembled so far.

They are sensible places to stop such as painting the warriors before placing on the ship though one is part way through building the helm. So you need to make a decision as to if you want to make sure this is painted up while you have ease of access or if you want to use the £30+ transport. This way lead to a new era of buying one model and painting it before using it and I sincerely hope it does but I for one kept I have mine in two sections to paint while still being usable in the mean time.

Please do not get me wrong this is not a bad thing as on models such as Rhinos if it said "stop to paint the inside before glueing the roof on" there would be less glued shut in anger are not being able to paint the console how they wanted.

Overall this is a very good model kit and unfortunately I feel that means you do need to treat it as you would any other model rather than a game piece and paint it before you use it otherwise you'll have difficulty getting to the fiddly parts and there are a lot of them. Also it comes on the old style flying bases which break too easily and it is not a small model being closer to a Land Raider than a Rhino foot print wise due to length and the outward facing flayers.

Until next time drink deep from the cauldron of Nurgle and accept his blessings into your life.

O'Shashar